Have plans to build a mobile app in 2026 but can’t decide between React Native and Ionic?
This is a common problem businesses encounter as cross-platform mobile development gains popularity. You can create native iOS and Android mobile apps using React Native and Ionic by utilising web technologies like HTML, CSS, and JavaScript.
But which framework should you choose for your next project?
The answer depends on your needs and priorities. React Native offers better performance and a more native app-like feel since it bridges web code directly to native UI components.
But Ionic provides great out-of-the-box components and tools that can help accelerate development. Ionic also makes it easier to build cross-platform Progressive Web Apps in addition to native mobile apps.
As we head into 2026, both frameworks continue to improve and expand their capabilities. There’s no definitively “best” option. Evaluate your app’s requirements, your team’s skills, and development time constraints.
Either React Native or Ionic can be great options for building high quality mobile apps efficiently. The key is choosing the framework that best fits your specific needs.
Exploring the World of Mobile App Development
It may make or break the game when it comes to developing mobile apps, therefore keeping up with the newest trends and selecting the ideal framework are crucial. The points that follow will clarify this for you.
1. Mobile App Development Trends: Observing trends is essential. The business is booming in 2024, and these developments are influencing how we create mobile applications. Globally, developers are adjusting to new technologies to keep their apps current and user-friendly.
2. Leading Mobile App Development Frameworks: Top mobile app development frameworks are like building blocks, shaping the way apps are created. Among the variety of choices, finding the best framework becomes pivotal for developers aiming to streamline their workflow.
What makes a framework the best? Let’s dig into the features and capabilities that set them apart.
- Performance Matters: The framework should ensure your app runs smoothly and responds quickly to user interactions.
- User Experience is Paramount: Creating a seamless and enjoyable experience for users is a top priority.
- Scalability for the Future: Choose a framework that grows with your app, adapting to increased complexity and user demand.
The search for the top mobile app frameworks is like finding the perfect tool for the job—ensuring optimal performance and user satisfaction.
Keep these factors in mind as we get into the details of mobile app development. It’s not just about trends or frameworks; it’s about creating experiences that stand out in the digital world.
We offer tailored solutions using React Native or Ionic to reduce your marketing time without compromising quality.
Application Development With React Native
Now let’s understand the React Native, a cross-platform tool that stands out in the mobile app development arena. When comparing React Native vs Ionic, there are several compelling reasons why many developers lean toward the former. We’ll explain this bit-by-bit.
What Makes React Native a Preferred Choice?
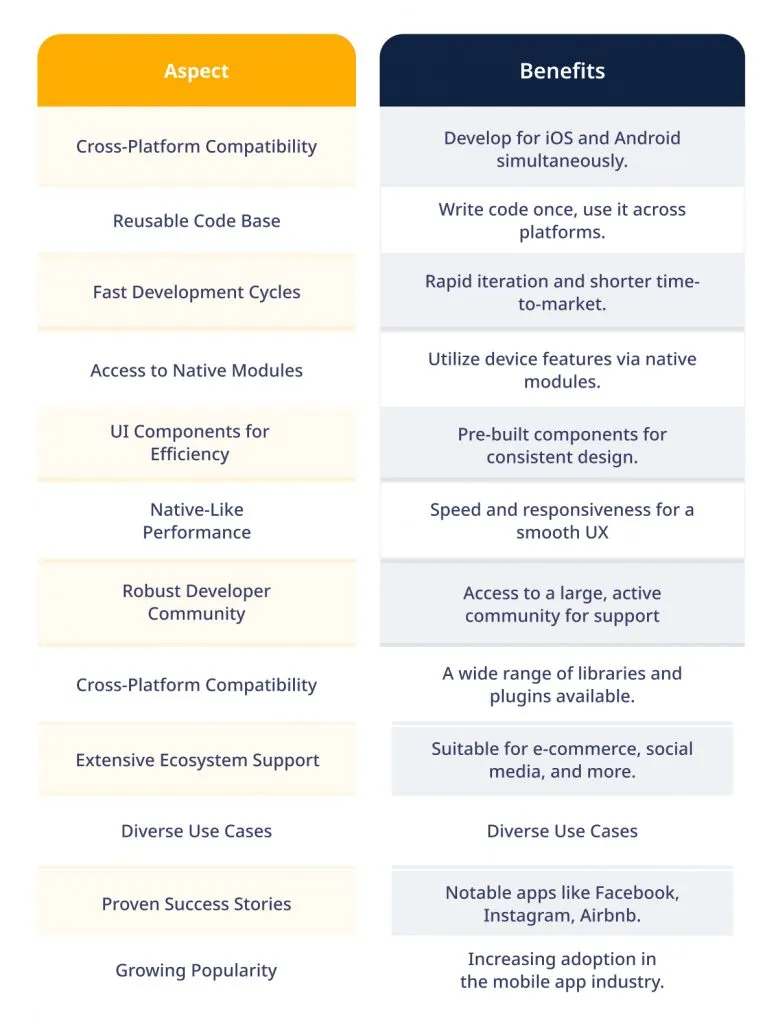
1. Native-Like Feel: React Native provides a seamless, native-like experience for users, enhancing the overall usability of your app.
2. Cross-Platform Capabilities: Develop your app for both iOS and Android with a single codebase, streamlining the development process.
3. Performance Excellence: React Native is known for its high-performance capabilities, ensuring speedy app responses and smooth interactions.
4. Wide Community Support: With a large and active community, you can tap into a wealth of resources, making problem-solving and learning more accessible.
5. Reusable Components: Build efficient apps by reusing components across different parts of your project, promoting consistency and saving development time.
6. JavaScript Familiarity: Leverage your existing JavaScript skills, as React Native allows you to use this widely-known language for app development.
7. Third-Party Plugin Integration: Easily integrate third-party plugins to enhance your app’s functionality, extending its capabilities without reinventing the wheel.
8. Real-Time Updates: Implement changes in real-time without going through the app store approval process, allowing for quick adjustments and updates.
9. Smooth Debugging: Debugging becomes a smoother process with the help of robust tools, reducing the time spent troubleshooting issues.
10. Strong Industry Adoption: React Native has gained significant traction in the industry, with many well-known apps built on this framework.
11. React Native vs Ionic Performance: When considering performance, React Native often outshines Ionic, especially in terms of responsiveness and speed.
As we explore the intricate world of mobile app development, React Native emerges as a versatile and powerful tool, offering a range of benefits for skilled developers.
In the React Native vs Ionic debate, these distinctive features make React Native a compelling choice for those aiming to deliver high-performing, cross-platform mobile application.
Also read: 9 Top-Notch Cross-Platform App Development Companies in India
Real-World Use Cases and Stories
To understand the comparision of React Native vs Ionicm, we have gathered some of the famous used cases and stories of the React Native.

1. Facebook
- Use Case: The app that needs no introduction, Facebook, employs React Native for its Ads Manager.
- Success Story: React Native allows for a consistent and smooth experience across various platforms, contributing to the success of Facebook’s advertising platform.
2. Instagram
- Use Case: Instagram, a social media giant, utilizes React Native for parts of its app, showcasing the framework’s adaptability.
- Success Story: React Native’s cross-platform capabilities enable Instagram to maintain a unified look and feel, crucial for user engagement.
3. Airbnb
- Use Case: Airbnb, a global travel community, adopts React Native for its mobile app development.
- Success Story: React Native streamlines the development process, allowing Airbnb to efficiently manage updates and deliver a consistent user experience.
4. Walmart
- Use Case: Walmart, a retail giant, integrates React Native into its mobile app for a seamless shopping experience.
- Success Story: React Native’s efficiency in cross-platform development helps Walmart cater to a diverse user base, enhancing the shopping journey for millions.
Key Takeaways
- React Native proves its versatility across various industries, from social media and travel to retail.
- Cross-platform tools like React Native contribute to a consistent user experience, regardless of the device or platform.
Partner with ValueCoders to optimize your mobile app development costs while maintaining top-tier performance.
How React Native Stands Out?
In the React Native vs Ionic debate, React Native’s real-world success stories underline its effectiveness as a preferred cross-platform tool.
React Native aligns with current Mobile App Development trends, offering a solution that balances performance and development efficiency.
As you learn more about the ever-evolving landscape of mobile app development, consider these success stories as a guide for choosing the best mobile app development approach.
Whether you’re aiming for seamless user experiences or efficient cross-platform development, React Native emerges as a compelling choice, backed by the success stories of industry giants.
If you’re ready to harness the power of React Native, don’t hesitate to explore opportunities to Hire React Developers and embark on your own success journey.
Challenges and Limitations of React Native
As we explore the terrain of mobile app development, it’s essential to recognize the challenges and limitations of the territory, especially when comparing React Native vs Ionic.
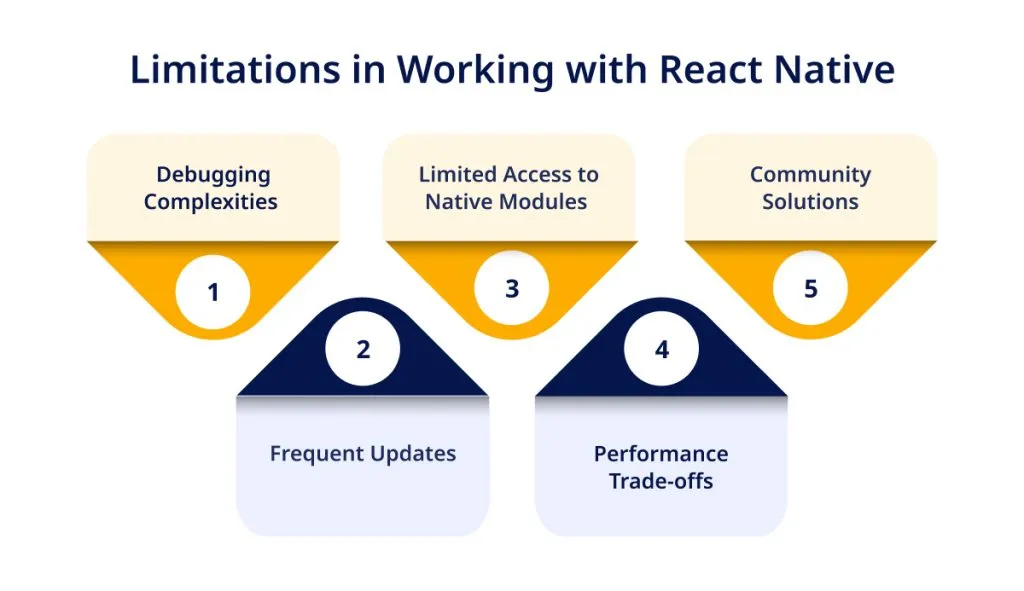
1. Performance Variability
- Challenge: Achieving optimal performance can be challenging, with occasional variations across different devices and operating systems.
- Insights: Developers must fine-tune performance for specific platforms to ensure a consistent user experience.
2. Third-Party Module Compatibility
- Challenge: Integrating third-party modules may present compatibility issues, affecting the overall stability of the app.
- Insights: Staying updated with module versions and community support can mitigate compatibility challenges.
3. Large App Size
- Challenge: React Native apps may have larger file sizes compared to native apps, impacting download and installation times.
- Insights: Developers need to optimize app assets and choose components wisely to manage app size effectively.
4. Limited Access to Native Features
- Challenge: Access to certain native device features may be limited in React Native, potentially affecting functionality.
- Insights: Assess the project requirements and consider native development for features demanding extensive native capabilities.
5. Learning Curve for Optimized Performance
- Challenge: Achieving peak performance in React Native may require a steeper learning curve for developers.
- Insights: Invest in continuous learning and leverage available resources to master optimization techniques.
While React Native has its challenges, it remains a strong contender in cross-platform tools, providing valuable insights for developers. Seeking Solutions with React Development Services can help you overcome these hurdles.
Application Development With Ionic
In the evolving world of mobile app development, Ionic emerges as a strong contender and is often considered the Best Framework for Mobile Apps. Let’s get into understanding Ionic, exploring its features and benefits.
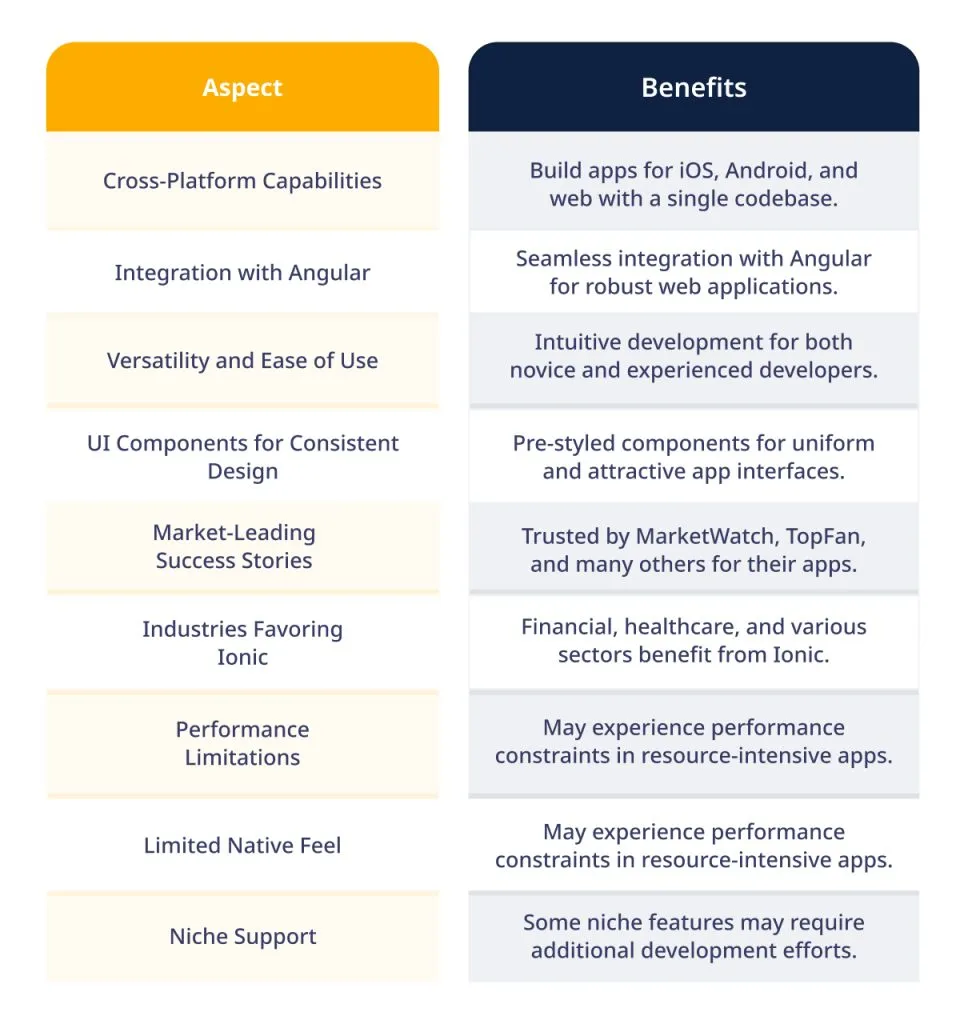
Key Characteristics of Ionic
- Cross-Platform Prowess: Ionic excels in cross-platform development, allowing developers to create apps compatible with both iOS and Android using a single codebase.
- Built on Web Technologies: Utilizing web technologies like HTML, CSS, and JavaScript, Ionic simplifies the development process for those familiar with web development.
- Rich Set of UI Components: Ionic offers a robust collection of pre-built UI components, facilitating the creation of visually appealing and user-friendly interfaces.
- Angular Integration: Integration with Angular, a widely-used web application framework, enhances the development experience, providing a structured and efficient approach.
Advantages of Ionic in the Mobile App Development Arena
- Cost-Effective Solution: Ionic’s cross-platform capabilities contribute to cost efficiency, as a single codebase reduces development and maintenance costs.
- Wide Developer Community: With a large developer community, Ionic users can tap into shared knowledge, resources, and support.
- Rapid Development: Ionic’s simplicity and the ability to reuse code expedite the development process, enabling faster time-to-market for your app.
While React Native and Ionic each have their strengths, Ionic’s focus on web technologies and ease of integration with Angular can make it an attractive choice depending on project requirements.
To harness the full potential of Ionic, consider the option to Hire Top Ionic Developers. Their expertise ensures a smooth development process and a polished final product.
Also Read – The Top Mobile App Development Companies To Watch
Real World Used Cases Stories
As we explore the expansive reworld of mobile app development, let’s spotlight real-world use cases and success stories that underscore why Ionic is often touted as the Best Framework for Mobile Apps.

1. Untappd
- Use Case: Untappd, a popular beer discovery app, leverages Ionic for its cross-platform development needs.
- Success Story: Ionic’s capabilities enable Untappd to offer a consistent user experience across iOS and Android, contributing to the app’s widespread acclaim.
2. MarketWatch
- Use Case: MarketWatch, a leading financial news platform, chose Ionic for its mobile app development.
- Success Story: Ionic’s efficiency allowed MarketWatch to deliver a feature-rich app with a cohesive design, ensuring users stay informed seamlessly.
3. Sworkit
- Use Case: Sworkit, a fitness app, harnessed the power of Ionic for its cross-platform requirements.
- Success Story: Ionic’s ease of use and rapid development capabilities enabled Sworkit to create a fitness app that resonates with users worldwide.
Key Takeaways
Ionic’s cross-platform prowess is evident in its successful adoption by diverse industries.
The choice between React Native vs Ionic often hinges on specific project requirements and development goals.
Elevating Success with Ionic: The success stories of apps like Untappd, MarketWatch, and Sworkit showcase Ionic’s ability to meet the demands of various industries. Hire Top Ionic Developers for Seamless Execution.
To replicate these success stories, consider hiring top ionic developers. Their expertise ensures a smooth development journey and a final product that exceeds expectations.
In the dynamic mobile app development landscape, Ionic continues to carve its place as a reliable and efficient framework. Real-world success stories highlight its versatility and potential, making it a strong contender in the ever-evolving debate of React Native vs Ionic.
When aiming for excellence in your app development endeavors, drawing on the experiences of industry leaders and considering the expertise of top ionic developers can be key to achieving stellar results.
Read more: Java vs JavaScript
Challenges and Limitations of Ionic
While planning a mobile app development, addressing the challenges and limitations that may arise when considering Ionic as your framework of choice is crucial.
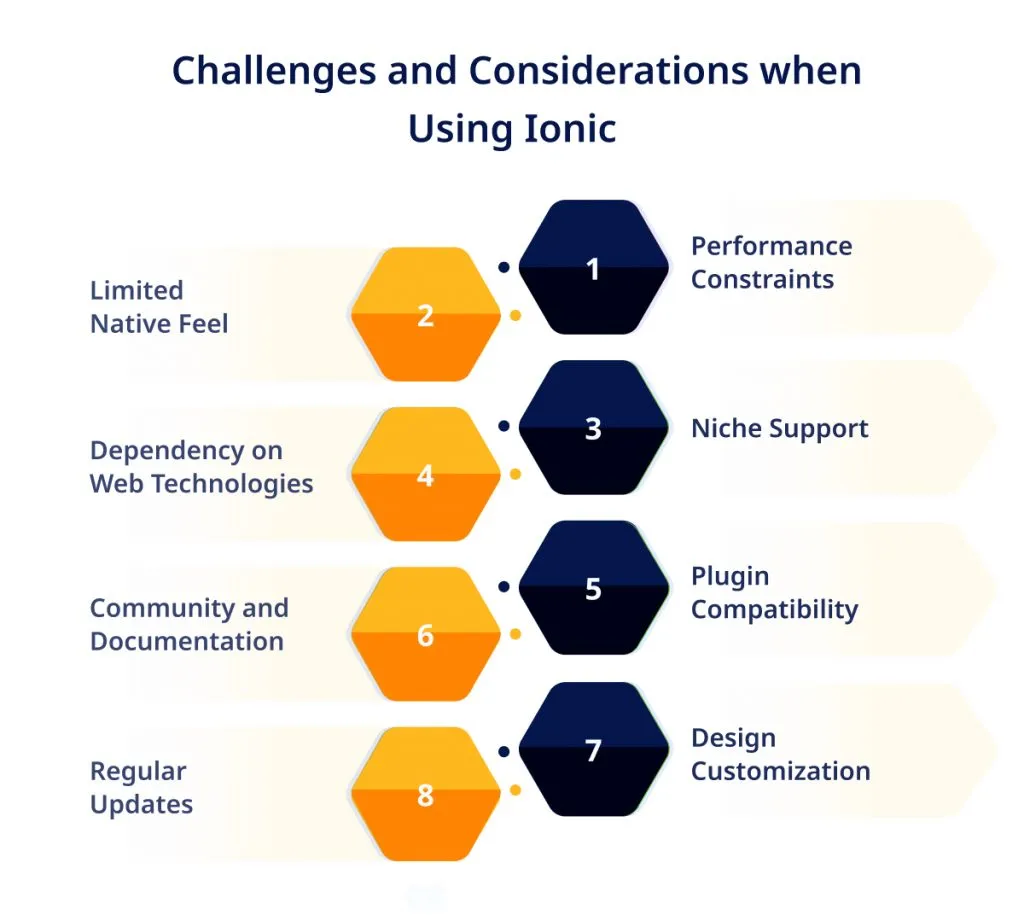
Here, we explore the potential roadblocks and how they align with the 10+ Reasons why you should go for Ionic.
1. Performance Considerations
- Challenge: Ionic’s performance may not match the native speed of some applications.
- Insights: Optimize code and utilize best practices to enhance app performance.
2. Native Features Accessibility
- Challenge: Access to certain native device features may be limited compared to native development.
- Insights: Evaluate project requirements and assess the importance of specific native functionalities.
3. Learning Curve for Complex Apps
- Challenge: The learning curve may be steeper for complex applications.
- Insights: Consider the complexity of your project and invest in comprehensive learning resources.
4. Design Customization Challenges
- Challenge: Customizing the app’s design may pose challenges compared to native solutions.
- Insights: Leverage Ionic’s theming capabilities and explore available design resources for customization.
5. App Size Concerns
- Challenge: Ionic apps may have larger file sizes compared to native counterparts.
- Insights: Optimize assets and selectively choose components to manage app size effectively.
Comparing React Native vs Ionic, each framework has its challenges, emphasizing the importance of aligning your choice with project requirements. To overcome these challenges, consider hiring top ionic developers. Their expertise can navigate complexities and ensure a polished final product.
Utilize the power of React Native and Ionic with us to build feature-rich apps offering exceptional user experiences.
Decoding the Duel: React Native vs Ionic – A Head-to-Head Comparison
In the vast landscape of top mobile app development frameworks, the choice between React Native and Ionic often takes center stage. Let’s conduct a thorough head-to-head comparison, gaining valuable app development insights along the way.
React Native
- Performance: Utilizes native components, delivering high performance and a seamless user experience. Allows for smoother animations and transitions, enhancing overall app responsiveness.
- Learning Curve: Requires familiarity with React and native elements, potentially steepening the learning curve. Offers an extensive community and documentation, aiding developers in overcoming challenges.
- Development Experience: Facilitates rapid development with a hot-reloading feature, allowing instant preview of code changes. Widely adopted by large companies, contributing to its robust community support.
Ionic
- Cross-Platform Capabilities: Employs web technologies (HTML, CSS, JavaScript), enabling cross-platform development. Integrates seamlessly with Angular, offering a structured approach to app development.
- Ease of Learning: Well-suited for web developers familiar with HTML and JavaScript, easing the learning curve. Simplifies app development through a comprehensive set of pre-built UI components.
- Development Efficiency: Facilitates rapid development with a focus on a single codebase for both iOS and Android. Ideal for projects with budget constraints, offering cost-effective cross-platform development.
React Native vs Ionic: Key Takeaways
-
Performance vs. Simplicity
React Native excels in performance but may require a steeper learning curve.
Ionic prioritizes simplicity, catering to web developers and promoting faster development.
-
Native vs. Web Technologies
React Native utilizes native components, enhancing performance but demanding native development skills.
Ionic leverages web technologies, providing a familiar environment for web developers.
Whether aiming for peak performance or a more straightforward development journey, understanding the intricacies of these frameworks is key to making an informed decision in the dynamic landscape of mobile app development.
Also read: Best React Native App Development Companies
Decision-Making Factors
As you stand at the crossroads of Top Mobile App Development Frameworks, the decision between React Native and Ionic requires thoughtful consideration. Let’s explore the key decision-making factors that will guide you through this intricate journey of React Native app development.
1. Project Goals and Requirements
- React Native: Ideal for projects demanding high performance and a native-like feel.
- Ionic: Suited for projects prioritizing cross-platform development with a focus on web technologies.
2. Budget Considerations
- React Native: Initial development may require more time but can optimize for peak performance.
- Ionic: Offers cost-effective cross-platform development, suitable for projects with budget constraints.
3. Learning Curve
- React Native: May have a steeper learning curve, especially for developers new to React and native elements.
- Ionic: Beginner-friendly, particularly for web developers familiar with HTML and JavaScript.
4. Development Speed
- React Native: Rapid development facilitated by hot-reloading for instant code previews.
- Ionic: Quick development with a single codebase for both iOS and Android.
5. Native Look and Feel
- React Native: Utilizes native components, offering an authentic native look and feel.
- Ionic: Prioritizes web technologies, potentially lacking a fully native appearance.
6. Community and Support
- React Native: Strong community support with extensive documentation, suitable for overcoming challenges.
- Ionic: Comprehensive set of pre-built UI components and a vibrant community, aiding in development.
7. Integration with Other Technologies
- React Native: Strong integration with various native modules and third-party libraries.
- Ionic: Seamless integration with Angular, providing a structured approach to app development.
Whether optimizing for performance, prioritizing cost efficiency, or aiming for a specific development speed, these consideration will be your trusted guideposts in making an informed decision for your React Native app development journey.
Our experts speed up your app development with React Native or Ionic, cutting delays for a faster launch.
In Closing
So now comes the most important question, which framework should you choose for your next mobile app project?
Well the answer is, it totally decision depends on your specific needs and priorities.
For a truly native app feel and maximum performance, React Native may be the best bet.
But Ionic provides quicker development and an easier path to PWAs. Evaluate factors like app complexity, timeline, budget, and your team’s skills. Oftentimes a hybrid approach using both frameworks can make sense too.
Whatever you choose, the most important thing is finding a partner able to bring your vision to life. If going the React Native route, be sure to hire React Native app developers with expertise building high-quality React Native apps.
With the right framework choice and development team like ValueCoders, you’re set up for mobile app success in 2024 and beyond. Use this guide to make the mobile app framework selection that fits your needs.